4 Ways to Make a WordPress Site Private Access Only
 Have you ever wanted to make a WordPress site private? So that only specific users are allowed access?
For example, for my found-images site eChunks.com, I decided to require user login in order to access any content. So now for that site, public access is not allowed, and any posts, images, and all other content is available only to logged-in users.
This tutorial explains four ways to make a WordPress site private or members only, so that only authenticated/trusted users will have access.
Contents
- Method 1: Use a plugin to require user login
- Method 2: Use a plugin and custom code
- Method 3: Restrict access based on IP address
- Method 4: Restrict access via HTTP Authentication
- Five-second summary
- Related resources
Method 1: Use a plugin to require user login
The easiest way to require login for site access is to use a plugin. There are several free plugins available that can do this, such as Force Login. I tested Force Login at eChunks.com and it works perfectly for what it does: prevents open access to all WordPress-generated content, posts, pages, views, etc., unless you are logged in.
Pros
The upside to using a plugin to limit access is that it is free and easy. Literally any monkey with half a brain can implement in a few minutes. Different plugins provide different features, so you’ve got some choices in terms of how/when/where to restrict content, require login, and so forth.
Cons
The main downside to using a plugin is that media files (like images, audio, video, etc.) are not protected. Of the several login-required type plugins I’ve tried so far, none of them protect any of the files that are stored in the WordPress /uploads/ folder (i.e., the Media Library). So if you’re going the plugin route to restrict access to your site, be aware that all of your media files will remain available to all users whether logged in or not.
Using a plugin is ideal if you don’t care that all of your media files remain publicly accessible. So if you want to use a plugin to make your site private, but also want to restrict access to your media files, check out the next method..
Method 2: Use a plugin and custom code
If you’re going the plugin route to limit access, but also want to protect media files, you can use a bit of custom code to make it happen. Basically you would use a plugin (such as Force Login or similar) to protect all of your posts, pages, and other front-end views. Then you would protect your media files with a bit of custom code. Here are a couple of custom code techniques that can do it.
Apache/.htaccess — I recently wrote about this technique over at .htaccess made easy. It is very simple to implement if you are familiar with .htaccess. Basically you add a snippet of code to your /uploads/ directory and done. The article includes plenty of context, details, and related tips and tricks. You can find the tutorial here: Require Login to Access WordPress Media Files.
PHP + Apache/.htaccess — For more control over how the media files are protected, you can use a dynamic scripting language such as PHP. There are numerous tutorials around the Web, the most useful and effective that I could find is here. Basically this technique uses a slice of .htaccess that calls a PHP script whenever a request is made for anything in your /uploads/ (Media Library) folder.
Pros
Using both a plugin and custom code, it is possible to require user login to access site content — including all media files. That is the major upside to this method. For just the basic “require user login” protection, go with the Apache/.htaccess solution. Or if you want to customize how your site responds to media-file requests, go with the PHP + Apache/.htaccess solution. Or if you are feeling lucky, get out there on the search engines and find a technique that works best for you.
Cons
Using both a plugin and custom code is sorta complicated, but not really. In terms of implementing, it’s more complex than just using a plugin. But that’s really the only downside to this second method. This solution is great for the following scenarios:
- You are using the Force Login plugin (or similar) and want to protect all media files, so in effect your entire site would require login to view everything.
- Or you just want to protect the media files and nothing else, in which case you would just use one of the custom code techniques and skip the plugin.
Method 3: Restrict access based on IP address
Instead of requiring user login to access the site, this method restricts access based on the user’s IP address. No plugin is required for this to work. All you need is to add a simple code snippet to your site’s .htaccess file. So it’s different than the previous two methods in that it doesn’t matter if the user is logged in or not; either way they won’t be able to visit the site unless their IP address explicitly is allowed access.
Admittedly there are limited use cases where this method makes sense, but it is very simple and seamless. Any user whose IP address is on the list will have access, while everyone else will be denied (or redirected to the login page).
.htaccess file to manage and update the IP addresses of allowed users. Trust me, IP addresses change frequently, so make sure you can edit the .htaccess file at any time.To implement this technique, add the following code to your site’s public root .htaccess file (e.g., /public_html/.htaccess).
# PRIVATE ACCESS
<IfModule mod_rewrite.c>
	RewriteCond %{REMOTE_ADDR} !^123\.123\.123\.123$
	RewriteRule .* - [F,L]
</IfModule>
That’s all there is to it really. That code protects the entire site, media files and everything else. Simply change the example IP address with your actual IP address. Note that the backslash \ before each dot is important. It makes the dots literal dots; otherwise without the backslashes the dots would match any character.
For example, if you do a lookup of your IP address, and find that it is (for example) 111.222.333.000, then you would edit the above code like so:
# PRIVATE ACCESS
<IfModule mod_rewrite.c>
	RewriteCond %{REMOTE_ADDR} !^111\.222\.333\.000$
	RewriteRule .* - [F,L]
</IfModule>
Add that to your site’s main .htaccess file and done. Of course, make sure you test well, using a proxy service or VPN to check other IP addresses, etc.
Multiple users
If/when you want to allow other users to access the site, then you can add more lines as needed. For example, here we are allowing three IP addresses:
# PRIVATE ACCESS
<IfModule mod_rewrite.c>
	RewriteCond %{REMOTE_ADDR} !^111\.222\.333\.000$
	RewriteCond %{REMOTE_ADDR} !^222\.333\.111\.000$
	RewriteCond %{REMOTE_ADDR} !^333\.111\.222\.000$
	RewriteRule .* - [F,L]
</IfModule>
And so forth, for as many IP addresses as needed. Apache/.htaccess can handle thousands of rules easily, so there is no real limit unless you start getting too crazy with it. Also, it would be silly to use this technique for more than a few dozen or so users. Why? Because as mentioned, IP addresses are prone to frequent change. So the more users you allow, the more you will be updating and managing their IP addresses in your site’s .htaccess file.
Redirect to login page (or any URL)
In the above technique notice the response that is sent for any denied IP addresses: the F in the [F,L] tells Apache to respond to any denied requests with a 403 “Forbidden” server status. That’s fine and optimal in most cases, but you may want to get a little more creative with it. For example, instead of 403 response, you can redirect any/all denied requests to the WordPress Login Page.
# PRIVATE ACCESS
<IfModule mod_rewrite.c>
	RewriteCond %{REQUEST_URI} !wp-login\.php [NC]
	RewriteCond %{REMOTE_ADDR} !^123\.123\.123\.123$
	RewriteRule .* wp-login.php [L]
</IfModule>
Notice in the RewriteRule the target destination, wp-login.php. That is the relative location of the file that displays the WP Login Page. So if the user’s IP address does not match, they will be taken directly to that location. Of course, you can change that destination to whatever you want, any URI that is accessible online.
Important: if you change wp-login.php to some other location, make sure also to change the wp-login\.php in the first RewriteCond. That tells Apache to allow everyone to access to the target destination. Otherwise it will be an infinite loop error. And if you need to allow public access to more than one file, like for scripts, styles, and images for example, you can add similar exclusions for each:
# PRIVATE ACCESS
<IfModule mod_rewrite.c>

	# allow public access to specific files
	RewriteCond %{REQUEST_URI} !wp-login\.php [NC]
	RewriteCond %{REQUEST_URI} !script\.css [NC]
	RewriteCond %{REQUEST_URI} !style\.css [NC]
	RewriteCond %{REQUEST_URI} !image\.png [NC]

	# allow access to specific ip address
	RewriteCond %{REMOTE_ADDR} !^111\.222\.333\.000$
	RewriteCond %{REMOTE_ADDR} !^222\.333\.111\.000$
	RewriteCond %{REMOTE_ADDR} !^333\.111\.222\.000$

	# redirect denied requests to login
	RewriteRule .* wp-login.php [L]

</IfModule>RewriteRule target destination, you can use any relative or full URL, like /wp-login.php (relative) or https://example.com/ (full).Pros
The upside to restricting access based on IP address is that it’s super simple and effective. For example, for my eChunks.com site, there are just a few registered users. So managing the IP addresses in .htaccess would require very little effort.
Cons
The big downside to this method is that it requires adding the IP address for each of your users. That could be a pain for more than a dozen or so people, trying to keep track of everyone’s IP address and maintain a current .htaccess file. So this technique really is recommended only for single-user sites that need to be online yet private. Or maybe sites with only a handful of users.
Method 4: Restrict access via HTTP Authentication
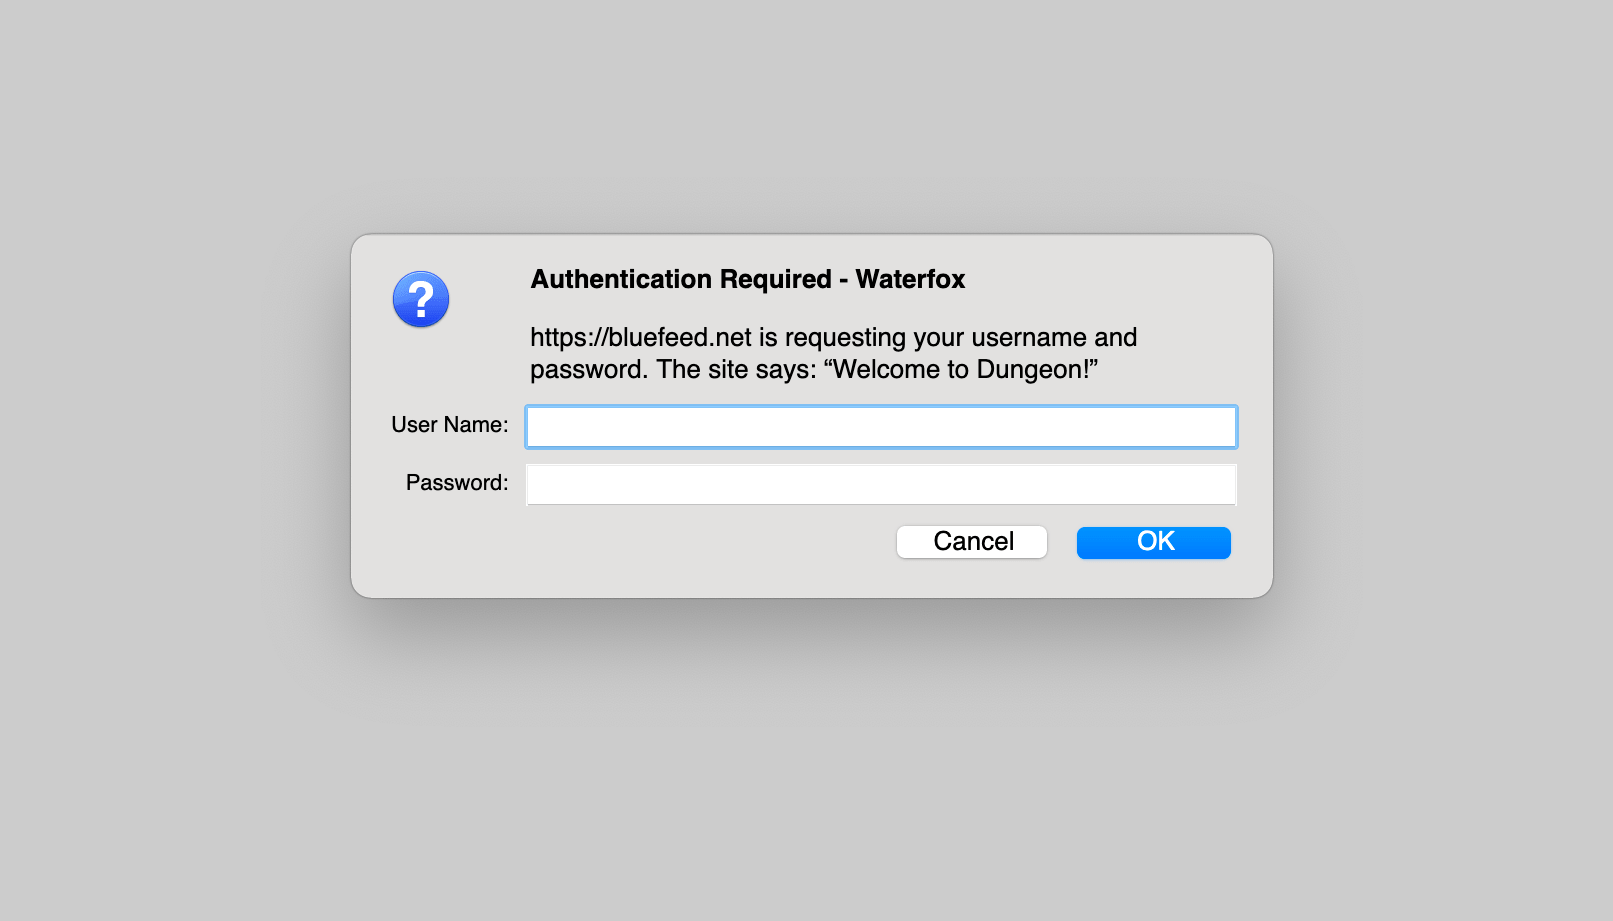
Last but not least, HTTP authentication. This is a very common Apache/.htaccess technique that literally protects your entire site with an authentication prompt. Surely you have seen them, when you go to visit some private site, a popup dialog appears asking for your credentials. Looks something like this, depending on browser:
Basically how it works: after implementing HTTP authentication for your site (or any specific directory), all requests must provide a username and password to gain access. If the user enters a correct username and password, they will have open access to your site until the end of the session (e.g., the browser is closed). Users who fail to provide correct credentials will get an “Unauthorized” response, something like this depending on server configuration:
Unauthorized — This server could not verify that you are authorized to access the document requested. […]
There are various ways to implement HTTP Authentication for your site. You can use straight-up Apache/.htaccess, PHP, Web API, REST API, or any number of available techniques. Setting up HTTP authentication is well-documented across the Web, so I won’t bother repeating it all here. Instead I will point anyone interested to the following useful resources:
If in doubt about HTTP authentication and how to implement for your site, consult your web host and/or documentation. They will be glad to help you get set up.
Pros
The upside to HTTP authentication is that it’s a familiar, transparent process. You can define as many (or as few) usernames/passwords as needed for your site. So your site could have one “master password” that only your team knows. Or you can create auth credentials for each user, etc.
Cons
There are several downsides to this method. First, implementing HTTP auth can be simple or painful, depending on your server config and web host. On some setups it is simple, others can be complicated and next to impossible. Another downside is that it is not very flexible. For example, with the previous IP-address method, you can control the target destination, server response, and other variables. With HTTP auth, it’s pretty much set in stone: unauthenticated users get a plain “Unauthorized” message that’s kinda ugly. Indeed, the lack of user friendliness with HTTP authorization is one reason why it may not be suitable for all websites.
Five-second summary
To sum up the four methods of making WordPress private access:
- Require user login — Easiest way is to use a free plugin
- Require login AND protect media files — Use a free plugin for the login requirement, and then a code snippet to protect all media files
- Restrict access based on IP address — Add a simple code snippet that limits any/all website access to specific IP address(es)
- Require HTTP authentication for access — Set up HTTP authentication to require correct username and password for site access
There are other ways to make WordPress private, but those are the main ways. For more ideas, check the Web.
Related resources
- Require Login to Access WordPress Media Files
- Allow access to external IPs during development
- .htaccess Password Protection Tricks
- Secure WordPress Login Page


