Set Up WordPress MultiSite on MAMP
 In this tutorial, you’ll learn how to install and run WordPress MultiSite on a MAMP webserver. Running multiple sites from a single installation simplifies and streamlines administration, and serving it all from a locally installed version of MAMP gives you everything you need to develop your network of sites for the Web.
WordPress enables you to create multiple websites from a single installation, requiring only one database and one set of files for thousands or even millions of sites. But it does require some tweaking and experimenting to really get the hang of WordPress MultiSite, so doing it on a live server may not be for everyone. Fortunately MAMP enables you to set up your very own local server environment in a matter of seconds on your Mac OS X machine. This is perfect for setting up WP MultiSite and developing your sites safely and securely behind the scenes.
Requirements
- Knowledge needed: WordPress, familiarity with Apache, MySQL, PHP
- Requires: WordPress, MAMP, Mac OS X (version 10.4.0 or later)
- Project time: 1 – 2 hours
If you’re not a Mac user, check out these _AMP alternatives for setting up WordPress locally.
Getting Started
To set up your own local server environment with MAMP, visit their website and download the free version to follow along with this tutorial, or grab the Pro version for greater functionality and flexibility. Then of course you’ll also need the latest version of WordPress, which is currently at 3.5.1. You can grab the latest from WordPress.org/download. Note that MAMP requires that your Mac is running Mac OS X 10.4.x or better.
Once you’ve downloaded MAMP and WordPress, you’re all set for the tutorial, which guides you step-by-step through the process of installing and configuring MAMP and WordPress for local testing and development. Upon completion, you’ll have a robust, flexible, and secure platform for developing your own network of sites.
Overview – What, How, and Why
Before diving in, it’s important to have a solid understanding of how everything works, sort of like seeing the “big picture” of what’s happening. The first thing we’re doing is installing and configuring MAMP, which stands for Mac, Apache, MySQL, and PHP, and basically provides you with a fully functional server environment on your Mac computer. So instead of trying to do it “gorilla-style” and develop multiple WordPress sites on a live server, MAMP enables you to build and test everything from the safety and comfort of your local machine.
Then after setting up MAMP, you’re ready to roll tough with WP MultiSite, which gives you the power and flexibility to build and operate multiple sites from a single installation of WordPress. Setting up WP MultiSite requires a little more configuring than regular, single-site WordPress, and so getting everything working on a local server environment like MAMP is a smart way to maintain control over the entire process.
That said, let’s start by installing and configuring MAMP, and then move on to setting up WordPress MultiSite. Along the way, we’ll provide some additional tips and tricks to help you get the most out of the experience.
Setting up MAMP
In the first part of the tutorial, we’ll install and configure MAMP on your local Mac machine. Once MAMP is set up and working properly, you’ll have a robust, flexible platform on which to develop and test anything that requires Apache, MySQL, and PHP. This alone is a powerful tool to have in your belt, and in the second part of the tutorial, you’ll learn how to set up WordPress MultiSite for virtually endless site-building possibilities.
Step 1: Installing MAMP
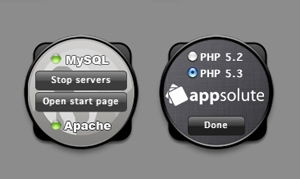 Once you’ve downloaded the latest version of MAMP, double-click the disk image and drag “MAMP” (not “MAMP PRO”) to your Applications folder. Note that you’ll need administrator permissions to install the MAMP software.
After installation, all of your MAMP files will be available in the Applications/MAMP directory. To facilitate expediency, you may want to create a shortcut to the MAMP directory and/or the MAMP.app application file.
MAMP also provides a handy Dashboard widget for direct control over your MAMP servers. To install the MAMP widget, copy the file Mamp Control.wdgt from the MAMP directory to the Widgets directory located at ~/Library/Widgets. The widget should work immediately when viewing your dashboard (see screenshot), but if it doesn’t you may need to reboot and/or double-click the widget file directly from the Widgets directory.
Step 2: Configuring MAMP
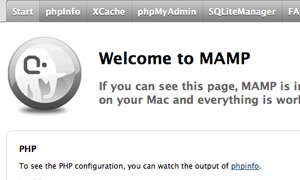 Once MAMP is installed, run the program by clicking the “MAMP.app” icon from the
 ~/Library/Widgets directory. As MAMP opens, you’ll be asked “Do you want the application mysqld to accept incoming network connections?” Yes, you do want that, so click the “Allow” button to proceed.
Next, MAMP will open a browser window and go to the default Start page, located at http://localhost:8888/MAMP/. As seen in the screenshot, the MAMP Start page contains a variety of resources, including a link to phpMyAdmin and your database connection parameters. Along the top of the page, you’ll find tabs for phpMyAdmin, XCache, and other major components. To create a local server environment, MAMP includes over 20 different programs, including eAccelerator, Zend Optimizer, Freetype, and many more. To see a complete list, visit the “FAQ” tab from the Start page.
In addition to the Start page, the application panel should also be visible after starting MAMP. As seen in the screenshot, the MAMP control panel enables you to Start/Stop the servers, Open the Start page, and set your Preferences. Clicking on the “Preferences” button brings up an options panel that provides some basic server settings. Let’s go through each of these settings and optimize our MAMP configuration for WordPress.
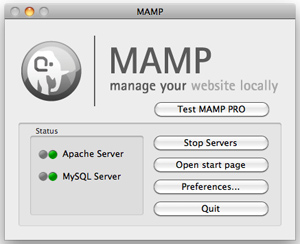 First, click on the “Start/Stop” button and check all of the options, as seen in the screenshot. Also notice that we can set an alternate URL for the MAMP Start page if desired.
Next we want to change the server ports from MAMP defaults (8888 and 8889) to Apache and MySQL defaults. To do this, click the button that says “Set to default Apache and MySQL ports”. This will set the Apache port to 80 and the MySQL port to 3306, which are both standard web-server port numbers.
Lastly, click on the “PHP” button and review the default settings, and then do the same for the Apache settings. For WordPress, the default settings for both of these options panels are going to work fine, so there is no need to change anything for this tutorial. Just know that they’re there, so if later on you decide to change something, you know where to do so.
Step 3: See it working
So MAMP is installed, and you can check functionality by creating a simple index.html file and adding something like <h1>Hello World</h1>. Then put the file in MAMP’s /htdocs/ directory. Then open a browser tab to http://localhost/ to get a basic idea of how MAMP is working. The /htdocs/ folder is like the root directory of your local site, and its URL is http://localhost/. We now have all we need to set up WordPress MultiSite.
Setting up WordPress MultiSite
With MAMP installed, configured, and ready to go, it’s time to install WordPress and set up MultiSite. WordPress provides a powerful, flexible framework for building websites, and with its MultiSite functionality, a single installation of the software enables you to create an unlimited number of websites using a single database and one set of files. It’s really powerful stuff, so learn more and get it for free at WordPress.org.
Step 1: Installing WordPress on MAMP
After downloading the latest version of WordPress, unzip the contents and move them to MAMP’s /htdocs/ folder. After the files have been moved, locate the wp-config-sample.php file in the root directory (htdocs), and rename it to wp-config.php. Then open the file and enter the following database connection settings:
/** The name of the database */
define('DB_NAME', 'wordpress');

/** MySQL database username */
define('DB_USER', 'root');

/** MySQL database password */
define('DB_PASSWORD', 'root');

/** MySQL hostname */
define('DB_HOST', 'localhost');
Once you get the database credentials dialed in, save the file and navigate to the MAMP Home Page in your browser. Click on the “phpMyAdmin” tab (near top of page) to open phpMyAdmin, which is basically an user-interface for the MySQL database. On the first page that appears in phpMyAdmin, there’s a field for creating a new database (see screenshot). Using the default settings, simply type “wordpress” in the “Create new database” field and click the “Create” button to create the database.
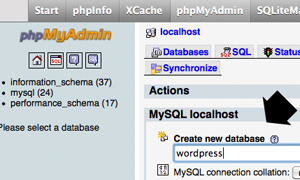 After the database is created, open a new browser tab to the WordPress installation page at
 http://localhost/wp-admin/install.php. Here you will specify a Site Title, Username, Password, and Email address. After filling them in, click the “Install WordPress” button to do so.
At this point, WordPress is installed and you should see the “Success!” message appear on the page. You’re now ready to set up MultiSite and begin your local website development on MAMP. Click on the “Log In” button to log into WordPress to get started with MultiSite.
Step 2: Setting up MultiSite
With MAMP and WordPress installed, it’s time to set up MultiSite, which enables you to create an entire network of sites. As we go, keep in mind that MultiSite is powerful stuff, and there are a LOT of settings and functionality involved. A complete guide to WP MultiSite is beyond the scope of this tutorial, but you can find all the gory details at the official Create a Network page in the Codex. In this part of the tutorial, we cover the basic requirements for setting up and running WordPress MultiSite locally on MAMP.
Begin the set up process by opening your site’s wp-config.php file from the /htdocs/ directory. Here we will define the MultiSite parameters near the bottom of the file. Just above where it says, “That’s all, stop editing! Happy blogging”, add the following line:
define('WP_ALLOW_MULTISITE', true);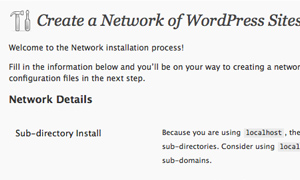 With that code in place, visit the WordPress Admin and click on the newly added “Tools > Network” item. On the “Create a Network of WordPress Sites” page, check that everything is filled in correctly and then click the “Install” button to create your network of sites.
Note: In this tutorial, sub-directories are required for sites added to the network. To use subdomains instead, refer to this guide: WordPress MultiSite Subdomains on MAMP.
After clicking the “Install” button, the Network page will display the remaining steps required to complete MultiSite installation. For the sake of completeness, we’ll go through each of these steps and explain a little further about the purpose of each.
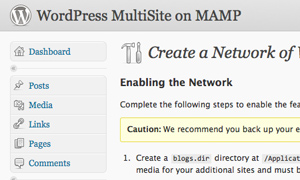 First create a directory named
 blogs.dir in your /wp-content/ folder, such that its path looks like /htdocs/wp-content/blogs.dir/. The blogs.dir folder is where WordPress stores uploaded media for your network of sites. This directory must be writeable by the web server.
Next open your wp-config.php file from the root directory, locate the line that says define('WP_ALLOW_MULTISITE',true);, and place the following code beneath it:
define('MULTISITE', true);
define('SUBDOMAIN_INSTALL', false);
$base = '/';
define('DOMAIN_CURRENT_SITE', 'localhost');
define('PATH_CURRENT_SITE', '/');
define('SITE_ID_CURRENT_SITE', 1);
define('BLOG_ID_CURRENT_SITE', 1);
These definitions are automatically generated and required for MultiSite to work. Note that a certain amount of customization is possible by tweaking these definitions, should you decide to experiment later on.
Lastly, create a blank file named .htaccess in your /htdocs/ directory and add the following code:
RewriteEngine On
RewriteBase /
RewriteRule ^index\.php$ - [L]

# uploaded files
RewriteRule ^([_0-9a-zA-Z-]+/)?files/(.+) wp-includes/ms-files.php?file=$2 [L]

# add a trailing slash to /wp-admin
RewriteRule ^([_0-9a-zA-Z-]+/)?wp-admin$ $1wp-admin/ [R=301,L]

RewriteCond %{REQUEST_FILENAME} -f [OR]
RewriteCond %{REQUEST_FILENAME} -d
RewriteRule ^ - [L]
RewriteRule  ^[_0-9a-zA-Z-]+/(wp-(content|admin|includes).*) $1 [L]
RewriteRule  ^[_0-9a-zA-Z-]+/(.*\.php)$ $1 [L]
RewriteRule . index.php [L]
If somehow you find any existing WordPress rules in your root .htaccess file, replace them with this code (see this post for more details).
Upon completion of these three steps, WordPress MultiSite is enabled and configured. Returning to the Admin Area in the browser, WordPress will require you to log in again. After doing so, click on the new “Network Admin” link in the upper-right corner of the screen to create, configure, and manage your Network of sites.
Next Steps..
WordPress MultiSite opens the door to endless possibilities, and there’s a LOT of cool features and functionality that you should explore by simply navigating through the Network Admin area. To create and add a new site to your Network, click on “Sites > Add New” menu item and fill in the blanks. To view and manage individual sites, click on the “Sites > Sites” menu and hover over any site on the list. As you hover, a variety of options will appear, enabling you to Edit, Deactivate, Archive, Spam, Delete, Visit the site, or go to its Dashboard.
As you develop locally, don’t forget to keep backups of your work. Using a Mac, you’re probably covered using Time Machine or similar, but if you ever just want to grab a complete backup of your entire local server, it’s easily done with a quick copy of your /Applications/MAMP directory.
Conclusion
In this tutorial, we’ve seen how to set up WordPress MultiSite locally on MAMP. Following the steps in this guide, you can create a powerful, flexible developing platform and host all of your sites with a single installation of WordPress.


5 responses to “Set Up WordPress MultiSite on MAMP”
First Floor~
osm post for me!
Awesome, thanks Jeff!
Thanks for this post.
Really helpful thanks for taking the time to explain.