
Build Your Own One-Click WordPress Content Importer
In this tutorial, I’m going to walk you through how you can add a new menu in WordPress Admin Area, where your users will be able to import any demo content — including widgets, their positions and navigation as well — by a single click. The code follows the best WordPress practices, uses WP Filesystem for file management, includes escaping and all text strings are prepared for translation. It also passes the WordPress theme check plugin!
The script in action…
Important note: this script will remove existing posts, pages, comments and media library from the database! So it’s recommended to use the script on a new WordPress install or demo/testing site. The script is meant to give you a starting point to build your own content importer and customize it as desired. Here is what our script will accomplish in a nutshell:
- Check webhosting settings, throw error message if something is not okay
- Copy demo media files into the upload folder
- Clear current posts, pages, comments and media library from the database
- Import demo posts, pages, comments and media library into the database
- Configure navigation, widgets and other settings
You can download the completed source files if you want follow along with the tutorial. I assume that non-beginner coders will read this article so I won’t explain every line. Let’s begin!
Preparing your demo content
So probably at this point your theme is finished already, filled with demo content and located on your local webserver, along with a new or test installation of WordPress. In this tutorial we’ll use the following path as reference to your finished theme folder: http://localhost/cooltheme/
Make sure that your uploaded media files are not stored in month- and year-based folders in the http://localhost/cooltheme/wp-content/uploads/ directory. This is important because we don’t want to mess with those folders when we copy the demo content. You can verify this setting in the WP Admin Area, under Settings ▸ Media ▸ Uploading files. Here is a screenshot of what that setting should look like:
In case you have some files that are organized in month and year folders, disable the “Uploading files” setting and save the changes. After that unfortunately you’ll have to go through the painful process of re-adding the files to the root of the /uploads/ directory. Basically for this tutorial, all media should be located in /uploads/ without using any year/month subdirectories.
Preparing the media files
Within your current theme’s directory, http://localhost/cooltheme/wp-content/themes/cooltheme/, create a folder named /importer/. Within that folder, create a folder named /media/. When finished, your theme should include the following directories:
/wp-content/themes/my-theme/                  <- theme directory
/wp-content/themes/my-theme/importer/         <- importer files
/wp-content/themes/my-theme/importer/media/   <- media files
Once that is set up, copy all files from your WP /wp-content/uploads/ directory, and paste them into the /media/ folder in your theme. Tip: if you are planning to distribute your theme publicly, make sure that all of the media files are properly licensed.
Exporting database content
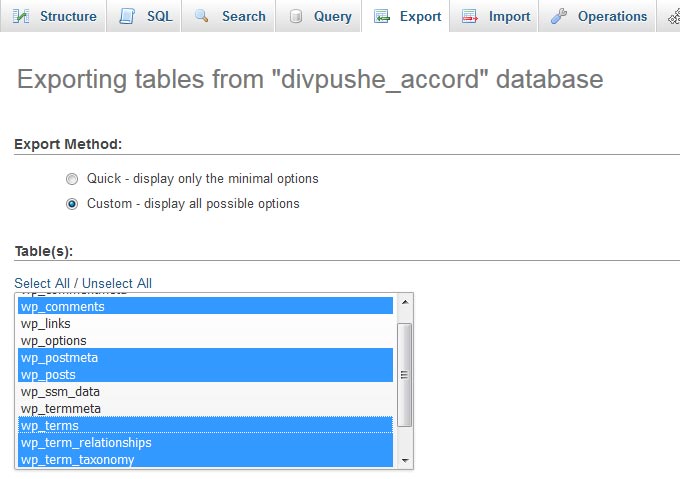
Now let’s export all the posts, comments, and pages from the database. I’m going to use phpMyAdmin for this, since it’s the most popular MySQL management tool out there. Obviously you can also use your own preferred tool, e.g. SQLyog, etc. Log in to your theme’s database via phpMyAdmin and follow these steps:
- Go to the Export tab
- Select the Custom export method
- Select these tables:
wp_comments,wp_postmeta,wp_posts,wp_terms,wp_term_relationships, andwp_term_taxonomy - Save the output to a file with character set UTF-8, no compression
- Set the format as: SQL
- At format-specific options select data only (if there’s an option for this), we won’t need the structure
- Function to use when dumping data: INSERT
- Syntax to use when inserting data: insert multiple rows in every INSERT statement
- Press the Go button and save this SQL dump file on your local machine
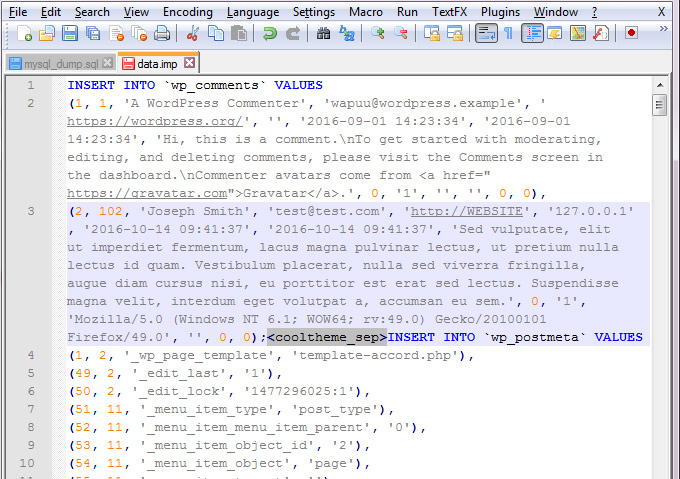
Now open the exported database file in your favorite text editor (I prefer Notepad++). Also create a new file, set its encoding to UTF-8, and save it as data.imp in your theme’s new /importer/ directory. This file will contain SQL data for insert.
Now copy all INSERT statements from the SQL dump and paste them below each other in data.imp. Make sure you copy-paste only the statements, leave comments and everything else behind. Finally put a unique separator among all statements, for example: <cooltheme_sep>, and remove all line breaks between the statements. This will help us to properly process SQL data later. Here is an image how your data.imp content should look something like this:
Add the Importer menu to the WP Admin Area
Now that the demo content is prepared, let’s code the Importer! Open your theme’s functions.php file and add the following code:
if (is_admin()) {
	include_once('importer/importer.inc.php');
}
Create a new file in your code editor, name it importer.inc.php, save it in the /importer/ directory. Then insert these code lines:
<?php

//add importer to WP admin
add_action('admin_menu', 'YOURPREFIX_add_demo_importer');

function YOURPREFIX_add_demo_importer() {
	add_theme_page(esc_html__('Demo Importer', 'cooltheme'), esc_html__('Demo Importer', 'cooltheme'), 'administrator', 'YOURPREFIX-demo-importer', 'YOURPREFIX_demo_importer_page');
}

//admin page
function YOURPREFIX_demo_importer_page() {
	global $YOURPREFIX_demo_importer_error;
	echo '<div class="wrap"><h1>'.esc_html__('Demo Content Importer', 'cooltheme').'</h1><div>';

}
With these lines we added a new demo importer menu under Appearance in WP Admin Area. It can be accessed only by an administrator or above. Important: You might want to switch YOURPREFIX strings to your unique prefix in all our code examples. Also change translation functions’ text domain (cooltheme) to your theme’s text domain.
Webhosting permission and capability check
Before we start importing we need to make sure that our script is allowed to read and copy files, create directories and read/write database. Different hosting systems have different limitations when it comes to file handling, so we’ll use the WP Filesystem API for file management. Insert the following code above the function YOURPREFIX_demo_importer_page() in importer.inc.php:
// webhosting permission and capability check
if (empty($_POST['YOURPREFIX_importing']) && $_GET['page'] == 'YOURPREFIX-demo-importer' && current_user_can('administrator')) {

	// is allow_url_fopen setting on in php.ini?
	if (ini_get('allow_url_fopen') != '1' && ini_get('allow_url_fopen') != 'On') {

		$YOURPREFIX_demo_importer_selfcheck[] = esc_html__('The allow_url_fopen setting is turned off in the PHP ini!', 'cooltheme');

	} else {

		// can we read a file with wp filesystem?
		global $wp_filesystem;
		if (empty($wp_filesystem)) {
			require_once(ABSPATH . '/wp-admin/includes/file.php');
			WP_Filesystem();
		}

		if (!$wp_filesystem->get_contents(get_template_directory_uri().'/importer/data.imp')) {

			$YOURPREFIX_demo_importer_selfcheck[] = esc_html__('The script couldn\'t read the data.imp file. Is it there? Does it have the permission to read?', 'cooltheme');

		}

	}

	// can we create directory?
	$uploads_dir = $wp_filesystem->abspath() . '/wp-content/uploads';
	if (!$wp_filesystem->is_dir($uploads_dir)) {
		if (!$wp_filesystem->mkdir($uploads_dir)) {

			$YOURPREFIX_demo_importer_selfcheck[] = esc_html__('The script couldn\'t create a directory!', 'cooltheme');

		}
	}

	// can we copy files?
	if (!$wp_filesystem->copy(get_template_directory().'/importer/media/book.jpg', $wp_filesystem->abspath() . '/wp-content/uploads/test.jpg')) {

		$YOURPREFIX_demo_importer_selfcheck[] = esc_html__('The script couldn\'t copy a file!', 'cooltheme');

	} else {

		$wp_filesystem->delete($wp_filesystem->abspath() . '/wp-content/uploads/test.jpg');

	}

	// can we read/write database?
	global $wpdb;
	if (!$wpdb->query('CREATE TABLE IF NOT EXISTS '.$wpdb->prefix.'testing (id mediumint(9) NOT NULL AUTO_INCREMENT, test varchar(255), UNIQUE KEY id (id))')) {

		$YOURPREFIX_demo_importer_selfcheck[] = esc_html__('The script is not allowed to write MySQL database!', 'cooltheme');

	} else {

		if (!$wpdb->query('TRUNCATE TABLE '.$wpdb->prefix.'testing')) {

			$YOURPREFIX_demo_importer_selfcheck[] = esc_html__('The script is not allowed to write MySQL database!', 'cooltheme');

		}

	}

}
In the example above, change book.jpg to a file that actually exists in the /uploads/ directory. As you can see the script collects error messages in an array. Let’s create a section in admin page where we can display these errors. We’ll also add the magic importer buttton and a notification to warn our users about database clearing. So find and extend YOURPREFIX_demo_importer_page() function the following way:
// admin page
function YOURPREFIX_demo_importer_page() {

	global $YOURPREFIX_demo_importer_selfcheck, $YOURPREFIX_demo_importer_success;

	echo '<div class="wrap"><h1>'.esc_html__('Demo Content Importer', 'cooltheme').'</h1>';

	if (empty($_POST['YOURPREFIX_importing'])) {

		// welcome message
		echo '<p>' . esc_html__('Here you can import sample content with a single click!', 'cooltheme') . '<br /><br />
			'. __('<b>WARNING! The importing process will remove your existing posts, pages and media library!<br />
			It\'s recommended to use a fresh, clean wordpress install!</b>', 'cooltheme') . '</p>';

		// show button if no error were found in selfcheck
		if (empty($YOURPREFIX_demo_importer_selfcheck)) {
			echo '<form method="post">
				<input type="hidden" name="YOURPREFIX_importing" value="1" />
				<input type="submit" name="submit" id="submit" class="button button-primary" value="' . esc_attr__('Import Now!', 'cooltheme') . '"  />
				</form>';
		}

	} else {

		// user pressed the import button
		if (!empty($YOURPREFIX_demo_importer_success)) {

			//successful import
			echo '<p><b>' . __('Demo content has been successfully imported!', 'cooltheme') . '</p>';

		} else {

			//something went wrong
			echo '<p><b>' . __('ERROR! Something went wrong!', 'cooltheme') . '</p>';

		}

	}

	// error messages from webhosting check
	if (!empty($YOURPREFIX_demo_importer_selfcheck)) {

		echo '<h2 class="title">'.esc_html__('Whooops!', 'cooltheme').'</h2>
			<p><b>'.esc_html__('One or more problems were found that needs to be fixed before the import!', 'cooltheme').'</b></p>
			<ul>';

		foreach ($YOURPREFIX_demo_importer_selfcheck as $err) {
			echo '<li>• '. $err .'</li>';
		}

		echo '</ul>';

	}

	echo '</div>';

}
You can visit your importer page now to find out if your actual local webserver has any problem with our script and to check for typos.
Copy media files and import MySQL data
If everything seems good at this point, we can copy our demo images/files, clear database tables, read and process data.imp file line by line and import the SQL data. Paste the following code above the YOURPREFIX_demo_importer_page() function:
// start importing
if (!empty($_POST['YOURPREFIX_importing']) && $_GET['page'] == 'YOURPREFIX-demo-importer' && current_user_can('administrator')) {

	// copy all media files
	global $wp_filesystem;
	if (empty($wp_filesystem)) {
		require_once(ABSPATH . '/wp-admin/includes/file.php');
		WP_Filesystem();
	}

	$files = glob(get_template_directory().'/importer/media/*.*');
	foreach($files as $file) {
		if (!$wp_filesystem->copy($file, $wp_filesystem->abspath() . '/wp-content/uploads/' . basename($file))) {
			$YOURPREFIX_demo_importer_error = '1';
		}
	}

	// clear tables
	global $wpdb;
	$wpdb->query('TRUNCATE TABLE '.$wpdb->prefix.'comments');
	$wpdb->query('TRUNCATE TABLE '.$wpdb->prefix.'postmeta');
	$wpdb->query('TRUNCATE TABLE '.$wpdb->prefix.'posts');
	$wpdb->query('TRUNCATE TABLE '.$wpdb->prefix.'term_relationships');
	$wpdb->query('TRUNCATE TABLE '.$wpdb->prefix.'term_taxonomy');
	$wpdb->query('TRUNCATE TABLE '.$wpdb->prefix.'terms');

	// read SQL dump and process each statement
	$data = $wp_filesystem->get_contents(get_template_directory_uri().'/importer/data.imp');
	$sql = explode('<cooltheme_sep>', $data);
	$current_url = get_site_url();

	foreach ($sql as $statement) {

		if (!empty($statement)) {

			// replace default wp prefix to user's choice if it's not the default one
			if (strstr($statement,'wp_comments') && $wpdb->prefix != 'wp_') {
				$statement = str_replace('wp_comments',$wpdb->prefix.'comments',$statement);
			}

			if (strstr($statement,'wp_postmeta')) {
				if ($wpdb->prefix != 'wp_') {
					$statement = str_replace('wp_postmeta',$wpdb->prefix.'postmeta',$statement);
				}
				// also replace all our sample paths to the user's actual path
				$statement = str_replace('http://localhost/cooltheme',$current_url,$statement);
			}

			if (strstr($statement,'wp_posts')) {
				if ($wpdb->prefix != 'wp_') {
					$statement = str_replace('wp_posts',$wpdb->prefix.'posts',$statement);
				}
				// also replace all our sample paths to the user's actual path
				$statement = str_replace('http://localhost/cooltheme',$current_url,$statement);
			}

			if (strstr($statement,'wp_term_relationships') && $wpdb->prefix != 'wp_') {
				$statement = str_replace('wp_term_relationships',$wpdb->prefix.'term_relationships',$statement);
			}

			if (strstr($statement,'wp_term_taxonomy') && $wpdb->prefix != 'wp_') {
				$statement = str_replace('wp_term_taxonomy',$wpdb->prefix.'term_taxonomy',$statement);
			}

			if (strstr($statement,'wp_terms') && $wpdb->prefix != 'wp_') {
				$statement = str_replace('wp_terms',$wpdb->prefix.'terms',$statement);
			}

			// run the query
			if (!$wpdb->query($statement)) {
				$YOURPREFIX_demo_importer_error = '1';
			}

		}

	}

	// navigation, widgets, other settings
	if (empty($YOURPREFIX_demo_importer_error)) {
		update_option('option_name','option_value');
		update_option('option_name',unserialize('serialized_option_value'));
	}

	// if everything went well
	if (empty($YOURPREFIX_demo_importer_error)) {
		$YOURPREFIX_demo_importer_success = '1';
	}

}
When a user presses the importer button, the $_POST['YOURPREFIX_importing'] variable receives a value and this is our sign to start importing. Note how we replace both instances of our demo path, http://localhost/cooltheme, with the user’s actual site path. Always check this path when you’re building a demo importer for a new theme.
Navigation, widget, and other settings
The last things we need to import are the settings from wp_options table. In your MySQL manager go to your theme’s database and list all contents of wp_options table sorted by option_name column. This table contains all your settings, like navigation, number of posts per page, active widgets, etc. You need to go through each of them to see which one is important for you and insert them with update_option() function, as you can see it in example code above. Some settings are stored in a serialized array. In those cases we need to put the value in an unserialize() function. Most of the option names are self-explanatory.
After testing you’ll see if you missed something anyway. Here are some important options: page_for_posts, page_on_front, show_on_front, sidebars_widgets, theme_mods_YOURTHEME. Widget informations are stored in the options named widget_*.
Testing and Debugging
We are ready to test our script! Create a fresh WordPress install on your local webserver for testing purposes. Copy your theme there, activate it, visit the demo importer page and hit the import button. If something went wrong, PHP error messages should tell you all the details (if they are turned on). You can also look for errors in your server’s log files. If everything went smoothly then your sample content should appear properly.
That’s it!
Besides a demo importer I also recommend you to provide a documentation for your theme which explains step-by-step how a user can set up things like your live preview. This is useful for customers, who don’t want to delete their existing content. At DivPusher WordPress theme club we use this method in our themes as well.
Download the source files
Here is a complete example of the code provided in this tutorial. The download file also includes a set of example media files and ready-to-go import file.
If you have any question, problem or fix, just drop a comment below!